INSTALLATION MANUAL & USER'S GUIDE
L.R. BAGGS PICKUPS
X-BRIDGE (U.S. STANDARD)
483 N. FRONTAGE RD.
NIPOMO, CA 93444
WWW.LRBAGGS.COM
1. PACKAGE CONTENTS
One (1) fully assembled X-Bridge
One (1) tremolo arm
Three (3) springs
Two (2) bridge posts
One (1) spring claw with mounting screws
One (1) prewired stereo output jack with washer and nut
One (1) volume pot (5 Megohm)
One (1) hex wrench for tremolo arm and saddle height adjustments
One (1) piece of 10" insulator sleeve
One (1) cable tie
Three (3) neoprene rubber bumper pads
2. OVERVIEW AND CAUTIONS
The X-Bridge is a tremolo bridge pickup that is a drop-in replacement for the American Standard Strat bridge. Post spacing is 2.2" center to
center. The Passive Stereo kit provides for independent outputs for the magnetic and X-Bridge pickups via the "tip" and "ring" contacts of a stereo
jack. A volume pot for the passive X-Bridge takes the place of a middle tone control. The tone functions are summed onto the other tone pot. The
wiring is designed for a typical 3-knob Strat. These instructions are written for guitars already set up with a tremolo bridge. There is no physical
modification required to the guitar body or pick guard.
We do not provide installation advice or support for home or hobbyist installations. Installers: please read the instructions carefully before
proceeding. We will not be responsible for any damage to the guitar or personal injury resulting from installation, use or misuse of the product.
Do not lift the saddles up off the bridge plate to see how high they will go! This tempting investigation has a high probability of damaging
the pickup. There is ample pickup wire to allow the full range of saddle movement for height and intonation.
3. INSTALLATION
1. Check to see if the X-bridge will fit over the existing posts on the guitar. If not, you will need to fill the holes and drill new ones to
accommodate the posts provided with the kit. Drill the new holes 6mm in diameter, 2.2" apart to center and 13/16" deep.
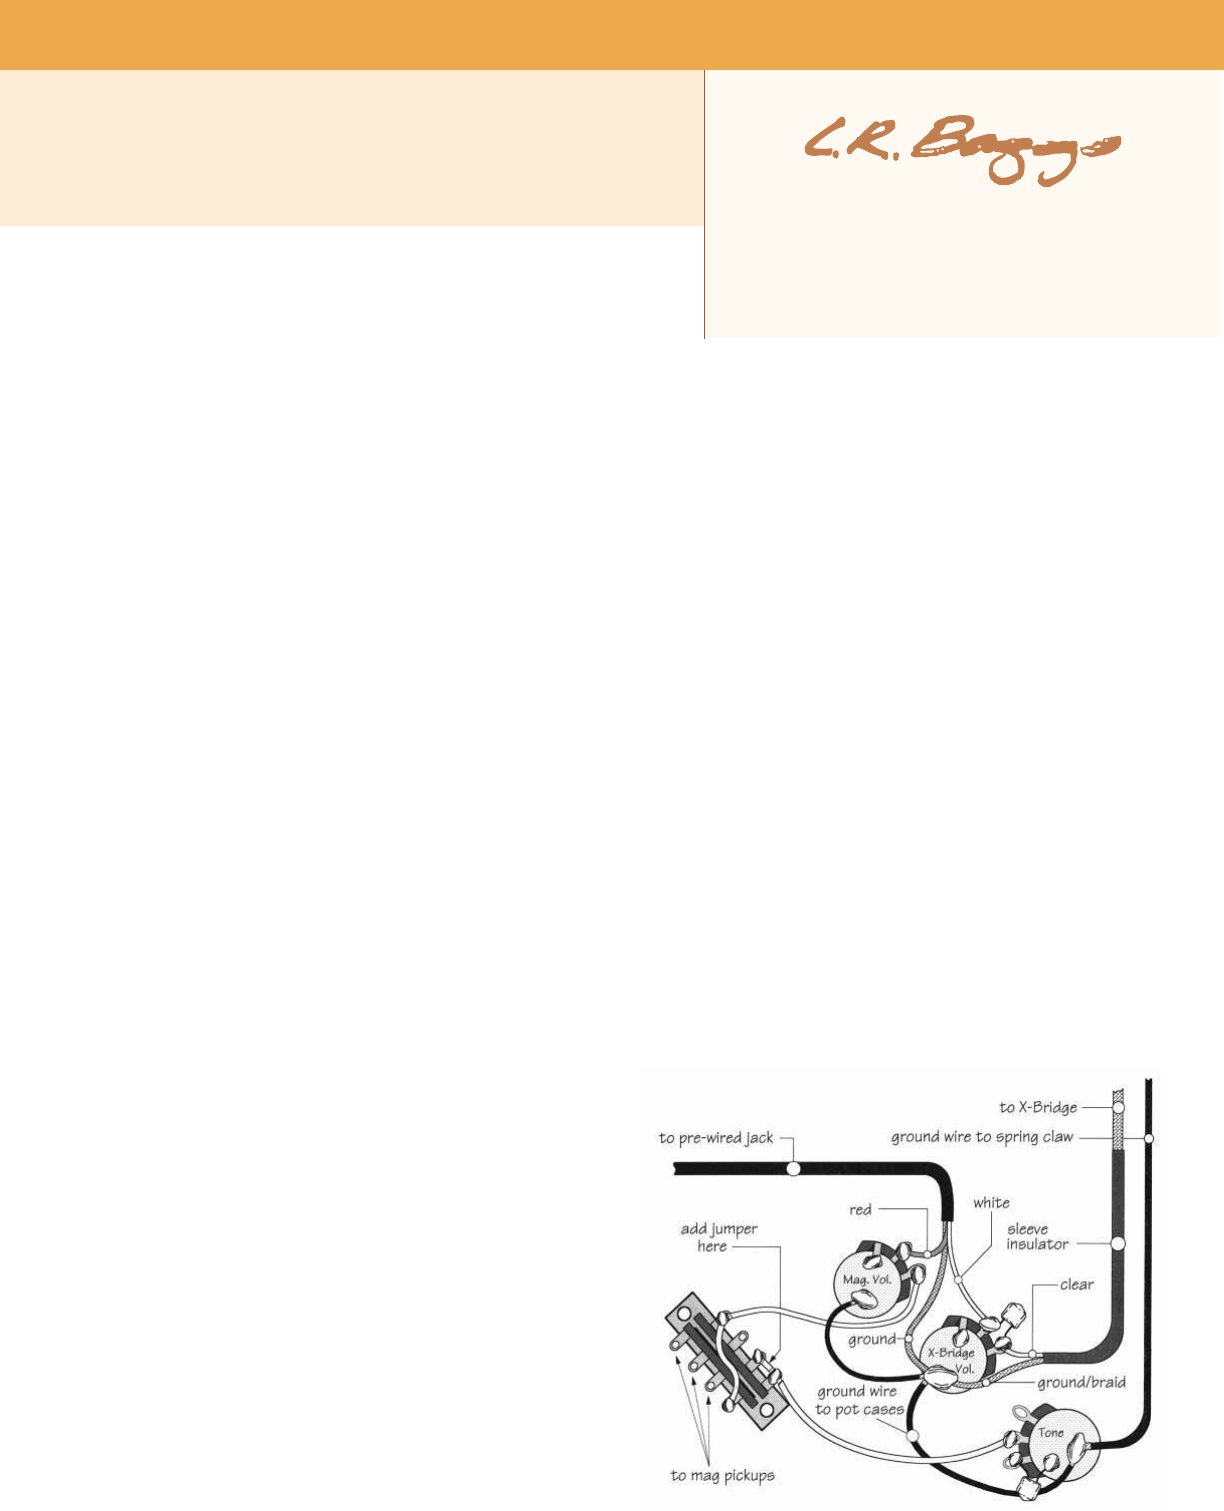
2. If you do not already have a claw in the spring cavity, install the one provided now. Be sure to solder a separate insulated ground wire from one
of the pot cases to the spring claw as shown in figure 1.
3. Set the bridge into the cavity over the posts and connect the three springs to the claw and bridge block.
4. Feed the braided coax wire from the bridge into the electronics cavity through the hole for the ground wire. Be sure to leave enough loose wire
in the spring cavity to allow full movement of the tremolo arm. Cover
the coax wire in the electronics cavity with the 10" insulator sleeve
provided. You may use the cable tie (provided) to secure the insulator
sleeve and to bundle wires together as appropriate. Do not over-
tighten the cable tie -- it can cut the inner insulation. Do not insulate
the portion of the coax wire within the spring cavity.
5. Disconnect and remove the existing jack and middle tone pot from
the guitar. Replace them with the ones included in the kit and connect
as shown in Fig. 1. Be sure to remove the wire that connects the middle
tone pot to the switch and solder a jumper between the two lugs on
the switch for the tone controls.
Note: The volume pot has a bypass capacitor pre-soldered to it. This
capacitor maintains the high frequency response of the X-Bridge as its
volume is reduced. Do not remove it.
4 . S E T U P A N D A D J U S T M E N T
1. It is highly recommended that the posts be set so the saddles are
sitting a little up off the bridge plate, on the hex adjusting screws,
when the action is right. This will minimize the chance of the pickup
wires being pinched between the plate and the saddle. Please resist the
temptation to lift the saddles off of the bridge plate just to see how
high they will go or what's underneath! This activity will have a high
probability of damaging the pickup.
fig. 1
 (2 pages)
 Manymanuals.com
 Manymanuals.de
 Manymanuals.fr
 Manymanuals.it
 Manymanuals.pl
 Manymanuals.cz
 Manymanuals.es
 Manymanuals-pt.com
Commentaires sur ces manuels